
Abstract
This article details the process of analyzing and modifying an RFID card, with the goal of understanding its operation and potential associated vulnerabilities. All content presented here is for educational purposes and seeks to promote more robust security practices in radio frequency identification systems. This information should not be used for fraudulent activities, and modifying or tampering with transit cards may be illegal in your country. Always respect ethical hacking principles and use this knowledge responsibly.
Introduction
Public transportation systems worldwide rely on contactless smart cards to facilitate quick and efficient payments. However, many of these systems were implemented years ago with outdated security measures, making them potential targets for security research. Inspired by a DEFCON talk where researchers analyzed their local transit card system, I decided to use some downtime during a trip abroad to investigate a transit card I picked up there, aiming to understand its security model and test for vulnerabilities.
In this post, I will walk through the entire process, from dumping the card data with a Proxmark3 to analyzing and modifying its contents to successfully change the stored balance and checksum. The goal is to highlight the importance of proper security in public transport payment systems.
1. Project Description
This whole thing started one afternoon while I was taking a break during my trip. I came across a DEFCON talk that caught my eye, featuring researchers who had analyzed the security of a transit card. I watched the whole thing, completely intrigued, and by the time it was over, I looked at the card I was using for my commute there and thought, “Why not investigate this one?” And well, a week later, here I am, writing this.
2. Tools and Setup
Before diving into the technical details, let’s go over the tools and setup I used to conduct this analysis:
- Proxmark3 - A powerful RFID tool used for reading and writing contactless cards.
- NFC Transit Card – The card we will analyze.
- Windows Machine - To run Proxmark3 software and analyze dumps.
- Hex Editor - Useful for manual data analysis and modifications.
3. Analysis Process.
3.1 Card Identification
Like most transit cards out there, this local transit card uses RFID, specifically NFC (Near Field Communication) which is a set of communication protocols that enables communication between two electronic devices over a distance of 4 cm or less.
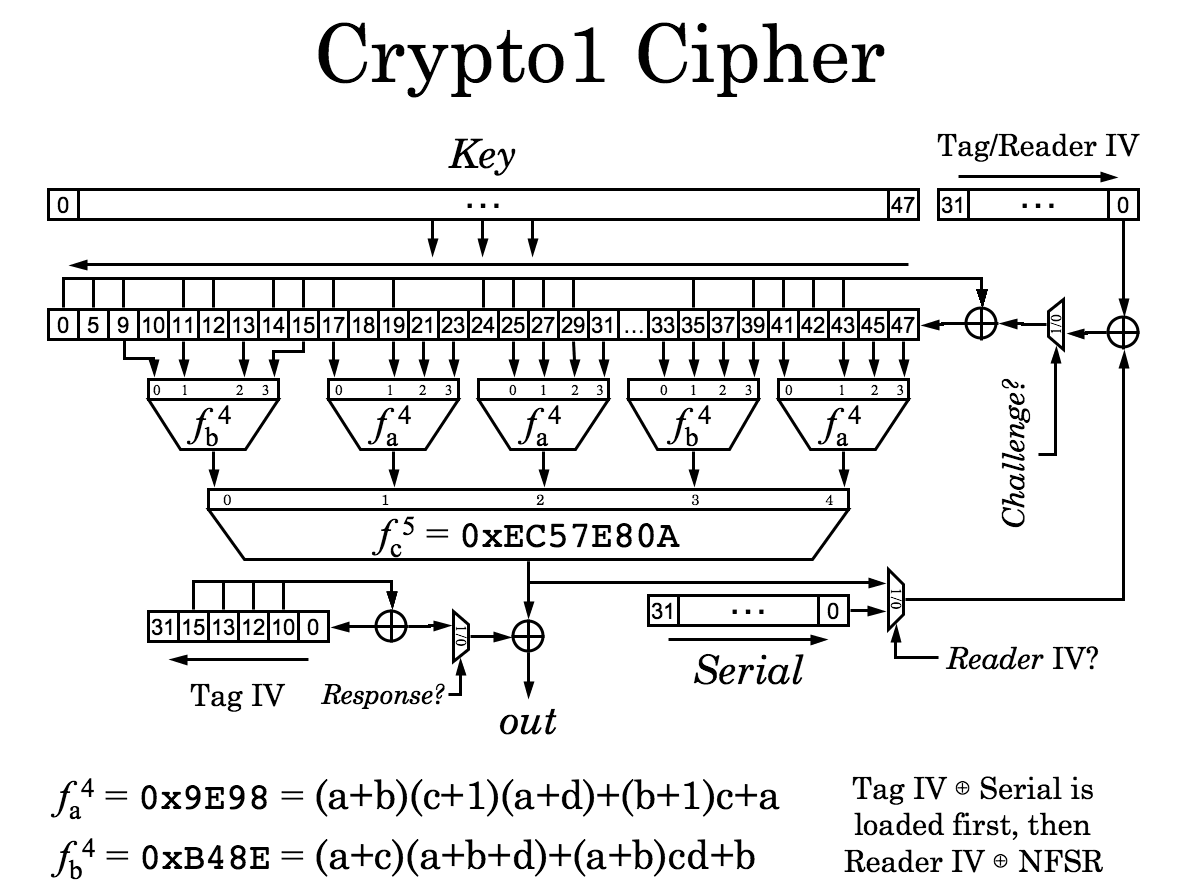
Luckily for me they also used MIFARE Classic, a series of integrated circuit chips used in contactless smart cards and proximity cards, developed by NXP Semiconductors, that employ a propietary security protocol for authentication and encryption called Crypto1.
In this case, it was a MIFARE Classic 1K card, meaning it stores 1024 bytes of data. These bytes are organized into 16 sectors, and each sector contains 4 blocks. Each sector is protected by two cryptographic keys:
- Key A
- Key B
The last block of each sector (called the Sector Trailer) stores Key A, Key B, and access control bits that define what operations (read, write, etc.) are allowed with each key. Some systems usually only use Key A, while others use both keys for different levels of access.
Unfortunately for businesses still relying on MIFARE Classic, their security protocol, Crypto1, has been deprecated for years, making it relatively easy to break.
3.2 Data Extraction
In order to reverse engineer the transit card, I first needed to dump its data into a binary file, so I used my Proxmark3 to extract the card’s contents. There are multiple attack methods available to recover MIFARE Classic keys, with nested and hardnested attacks being the most common. Before diving into which one I used, lets briefly explain how they work.
-
Nested Attack: This attack takes advantage of the fact that once you authenticate to a sector of the card using a known key, you can extract encrypted data that helps recover other keys more quickly. The attack works as follows:
- Authenticate with a known key in any accessible sector.
- Intercept the encrypted messages exchanged between the card and the reader.
- Exploit weaknesses in the Crypto1 encryption to compute keys for other sectors.
This attack is fast and works on vulnerable cards without additional protections.
-
Hardnested Attack: The hardnested attack is an improved version of the nested attack. It was designed to bypass security measures that blocked the original method. It uses more efficient calculations and optimized brute-force techniques to extract keys faster and with fewer failed attempts.
The main difference from the nested attack is that it relies on advanced mathematical techniques to significantly reduce the time needed to recover keys, even when the card has stronger protections.
In my case, I used the hardnested attack, which allowed me to retrieve all the keys in less than 15 minutes. Once I had all the keys, I used my Proxmark3 again to dump the entire card into a binary file as well.
3.3 Reverse Engineering the Data Structure
Lets take a look at a tiny portion of the card dump.
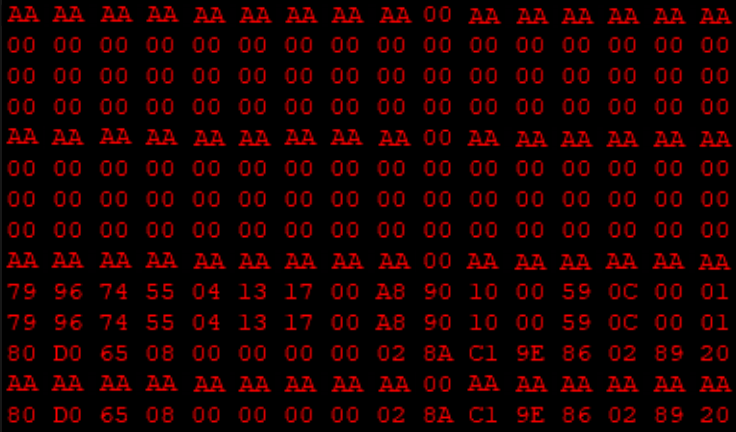
(For the sake of simplicity, the screenshot does not show the entire binary—note that it stores 1024 bytes in total—and the sector keys have been redacted.)
At first glance, it is difficult to get an idea of how the card’s data structure is designed. Performing a static analysis based on a single dump would be a highly complex and time-consuming task. My primary goal was to identify the bytes storing the balance to see if I could modify them, effectively changing the card’s balance at will.
The first sector contains the card’s UID (Unique Identifier). The next few appear to be empty, and the following sectors seem to store information related to the card’s balance, a history of recent transactions, and possibly other transit-related data.
Having identified the relevant sectors, I continued with my byte elimination strategy. To do this, I made payments with the card and dumped its data after each transaction. By repeating this process, I was able to track the bytes that kept changing after every transaction in the relevant sectors.
After repeating this process a few times without being able to eliminate more bytes, I began analyzing the ones that changed after each transaction. Knowing that my card had a balance of €27.98 in the dump I was analyzing, I started searching for bytes that could be related to this value. Before long, I noticed something interesting in a particular block.

When converting some hexadecimal values to decimal, I found that 0xDC15 equaled 56,341, which didn’t seem to have any clear relationship with my balance. However, I then tried interpreting the bytes in little-endian format, which is defined as a byte order wherein the least significant byte (or ‘little end’) of a multibyte data value is stored at the lowest memory address.
By reading the value in little-endian, I obtained 0x15DC, which equals 5,596. It didn’t take long for me to realize that if I took my card balance (€27.98) in cents, I would get 2,798, which is exactly half of 5,596.
With this, I had successfully identified the specific bytes holding the balance, where the value represents twice the actual card balance in cents and is stored in little-endian format.
4. Modification and Testing
4.1 Modifying the Balance Field
Once I had a clear understanding of the card’s data structure and identified the bytes storing the balance, I began a trial-and-error process to see if I could modify the balance without breaking the card.
I calculated that if I wanted to set the balance to €50, it would be stored as 10,000. In hexadecimal this is 0x2710, and since the bytes are stored in little-endian format, the final modified block would look like this:

After using my Proxmark3 to modify the card, I attempted to verify the new balance using the city’s official transit application, expecting to see €50. However, the app returned a reading error and failed to display the modified balance.
This confirmed that I was still missing a critical piece of the puzzle. The fact that the official app rejected the card—despite the raw bytes being changed—was a clear indicator that an integrity check (likely a checksum) was in place invalidating my modification because the data didn’t match the expected signature. This led me to investigate further.
I was certain that there had to be a checksum validating the card’s balance. So, I continued analyzing the dump, this time looking for bytes that changed along with the balance and had some sort of mathematical relationship. Surprisingly, it took me half the time to find the checksum and understand its logic than it did to find the balance itself.
4.2 Understanding and Bypassing the Checksum
For those who have been paying attention, you might have noticed that in the screenshot of the block that stores the balance, there was another byte that changed apart from the balance bytes.
Knowing that the balance bytes were stored in little-endian format, I assumed the checksum would be as well. So, I decided to convert 0xFFFFEA23 to decimal, which resulted in 4,294,961,699—an extremely large number that didn’t seem to have any obvious relation to the balance. That was until I went back and checked the previous dumps I had made after each transaction.
I discovered that every time I made a transaction, the exact amount deducted from the balance was added to the checksum. This inverse relationship led me to suspect a logical operation rather than a complex algorithm.
Not long after, I realized that the checksum was simply the bitwise NOT (or 1’s complement) of the balance. In binary arithmetic, this is equivalent to XORing the balance bytes with 0xFFFF (the two fixed 0xFF 0xFF bytes visible next to the checksum bytes). Looking at the image above, if you were to XOR 0xDC15 with 0xFFFF, you would, unsurprisingly, get 0x23EA, exactly the checksum value associated with that balance value.
4.4 Testing the Modified Card
Finally, the moment of truth arrived. The only way to verify if my analysis of the checksum logic was accurate was to check the current balance of the card using that city’s transport application again. After writing the modified balance and checksum to the card using my Proxmark3, I verified the card state using the transit application, which accepted the modified data and correctly displayed the new balance.
This confirmed that the custom checksum logic was valid and that the card’s data structure was fully reverse-engineered.
5. Security Implications and Ethical Considerations
This research highlights a critical security flaw in the transit card system: the fact that the card itself, rather than a centralized database, is treated as the primary source of truth for balance validation. This design choice makes the system inherently vulnerable to manipulation, as demonstrated in this analysis. If the card balance were instead stored and verified against a secure backend server, unauthorized modifications would be much more difficult to perform.
One of the key weaknesses here is the lack of cryptographic integrity checks. While the card does include a checksum mechanism, it is a simple arithmetic operation rather than a strong cryptographic signature. Implementing cryptographic signatures using a private key stored on the issuer’s servers would prevent unauthorized modifications, as any altered balance or transaction history would fail validation.
Another critical issue is the use of MIFARE Classic cards, which are well known for their weak security due to vulnerabilities in their encryption scheme (Crypto-1). Modern transit systems should transition to more secure smartcard technologies such as MIFARE DESFire or other contactless cards with strong cryptographic protections. These newer cards support mutual authentication and encryption, making cloning or modifying stored data significantly more difficult.
From an ethical standpoint, this research was conducted purely for educational purposes, aiming to highlight weaknesses in transit payment systems and encourage improvements in security practices. Unauthorized modification of fare balances is illegal and can result in serious consequences. The goal of this post is to raise awareness and help transit authorities understand the risks associated with storing critical data on user-controlled media without proper security measures.
Ultimately, the most effective way to secure transit systems is to minimize trust in the card itself. A centralized validation system, where the card serves only as an identifier while all balance and transaction data are securely managed on backend servers, would eliminate the possibility of local tampering. Until such improvements are widely adopted, legacy transit systems remain at risk of exploitation.
6. Conclusion
This journey into understanding and reversing this city’s transit card system has been both challenging and fascinating. Throughout this process, I’ve learned a lot—not just about how these cards work, but also about the security flaws that exist in systems we use every day without a second thought.
I hope this post has been as interesting for you to read as it was for me to explore. If nothing else, I hope it has given you some insight into how transit systems store and validate data, and why security in these systems is so important.
Thank you for taking the time to read this! I really appreciate it, and I hope you’ve learned something new along the way—just like I did.
— Redaa.